Authenticate Users with a Microsoft Account
This tutorial shows how to let users log into your Gramex application with their Microsoft accounts. Specifically, we will go over how to:
- set up an app registration on Microsoft Azure that recognizes a Gramex application,
- use the OAuth2 handler to connect a Gramex application to the Azure app.
Prerequisites
To follow through this tutorial completely, you will need:
- A Microsoft account
- Gramex Enterprise
Gramex Enterprise can be installed as follows:
pip install gramexenterprise
gramex license accept
Set up an App Registration on Azure
Go to portal.azure.com and log in through your
Microsoft account.
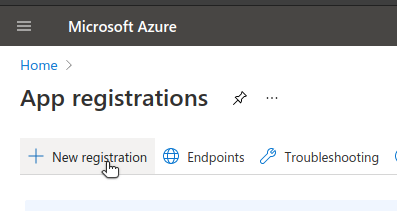
At the top of the page, type “app registration” in the search bar, and select the “App Registrations” service which shows up in the search results.

You should now be able to see a page for app registrations. Then, click “New registration” at the top left of the page.
Then, you should be able to see the application registration form. Give it an appropriate name, and leave the “Supported account types” section to the default selection.
Specifying the Redirect URI
At the bottom of the app registration form, we will need to specify a redirect
URI. This must be the fully qualified login URL of your Gramex application.
For example, if the login URL of a particular endpoint in your Gramex
application is /$YAMLURL/login/, and you are running Gramex on localhost:9988,
then the redirect URI to be added here is http://localhost:9988/login/.
Getting the Client ID and Client Secret
After you register the application, you should be redirected to the applications
registrations details page. Before proceeding, create a file named
.secrets.yaml in your project directory, if it doesn’t already exist. (To learn
more about how Gramex secrets work, see this.)
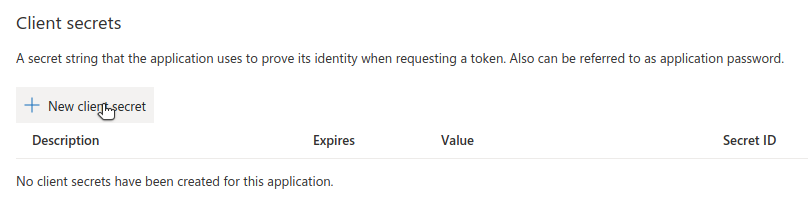
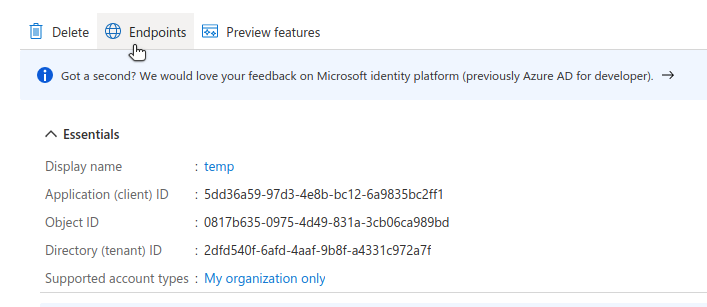
Then, on the Azure portal, under the “Essentials” section of the app
registration, click on “Add a certificate or secret”.

At the bottom of this page, you should see a section for client secrets. Click ‘New client secret’.
Create the secret, and copy it.
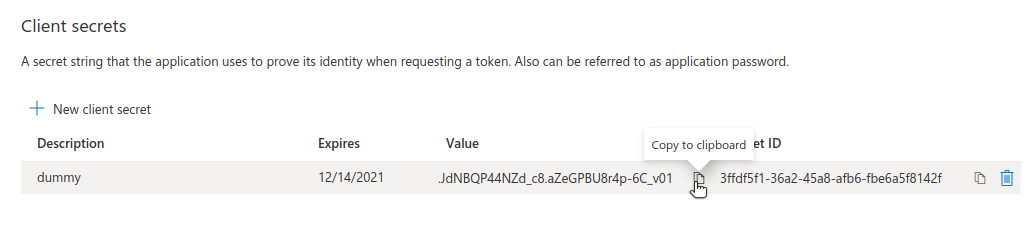
Note: We need to copy the “Value” of the secret, not its ID.
Add the copied secret to .secrets.yaml under the name AZURE_CLIENT_SECRET.
Your .secrets.yaml should have the following line:
AZURE_CLIENT_SECRET: "<secret copied from the portal>"
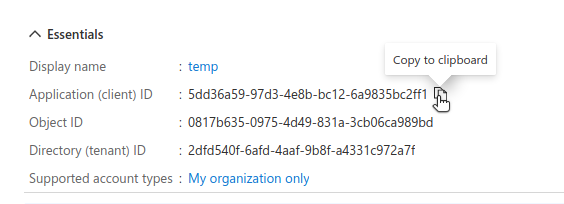
Next, go to the “Essentials” section, copy the “Application
(Client) ID”, and add it to .secrets.yaml under the name AZURE_CLIENT_ID.
Getting the Authorization and Access Token URLs
There are two more values we need to retrieve from the app registration, namely the authorization URL and the access token URL. Click the “Endpoints” tab at the top of the app registration page.
This should reveal a list of endpoints, which look like this:
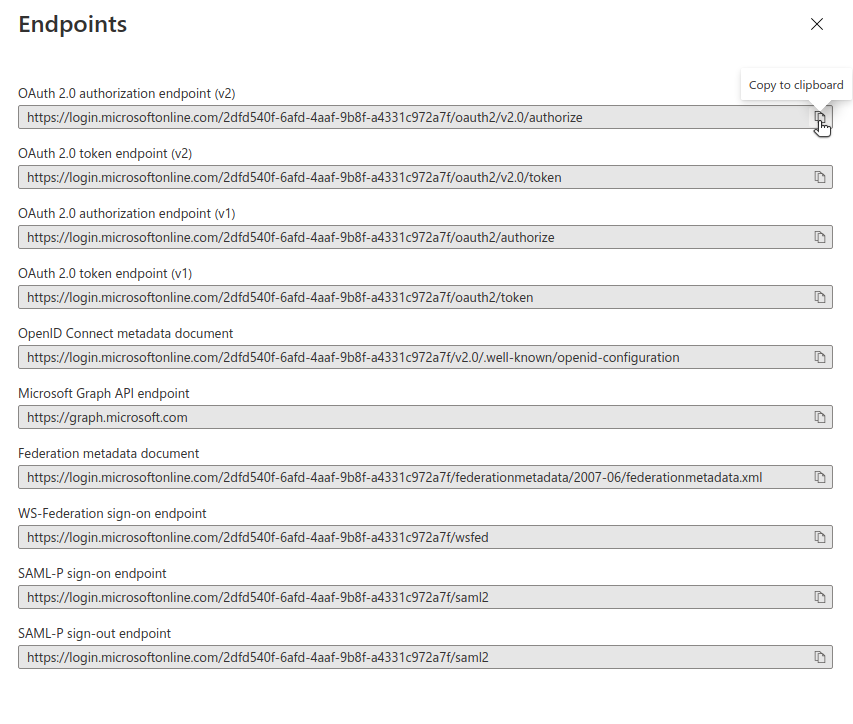
Copy the first two URLs in the list (the authorization endpoint and the token
endpoint) and put them in .secrets.yaml under the names AZURE_AUTHORIZE_URL
and AZURE_ACCESS_TOKEN_URL respectively.
Finally, make sure that your .secrets.yaml contains these four variables:
AZURE_CLIENT_IDAZURE_CLIENT_SECRETAZURE_AUTHORIZE_URLAZURE_ACCESS_TOKEN_URL
We are now ready to set up the OAuth2 handler
Setup the Gramex OAuth2 Handler
In your gramex.yaml, use the following spec:
url:
  azure_oauth-login:
    pattern: /$YAMLURL/login/ # Login URL - This must map to the redirect URL provided to Azure
    handler: OAuth2
    kwargs:
      client_id: $AZURE_CLIENT_ID
      client_secret: $AZURE_CLIENT_SECRET
      authorize:
        url: $AZURE_AUTHORIZE_URL
        scope:
          - https://graph.microsoft.com/User.Read
      access_token:
        url: $AZURE_ACCESS_TOKEN_URL
        body:
          grant_type: "authorization_code"
      user_info:
        url: "https://graph.microsoft.com/v1.0/me"
        headers:
          Authorization: "Bearer {access_token}"
Your users can now log in with their Microsoft accounts.